系统开发
介绍使用Java代码来开发基于Biz-SIP业务中台的系统。
一、概述
Biz-SIP中间件在开发应用时,主要涉及配置文件编写和Java代码开发,系统架构如下所示:
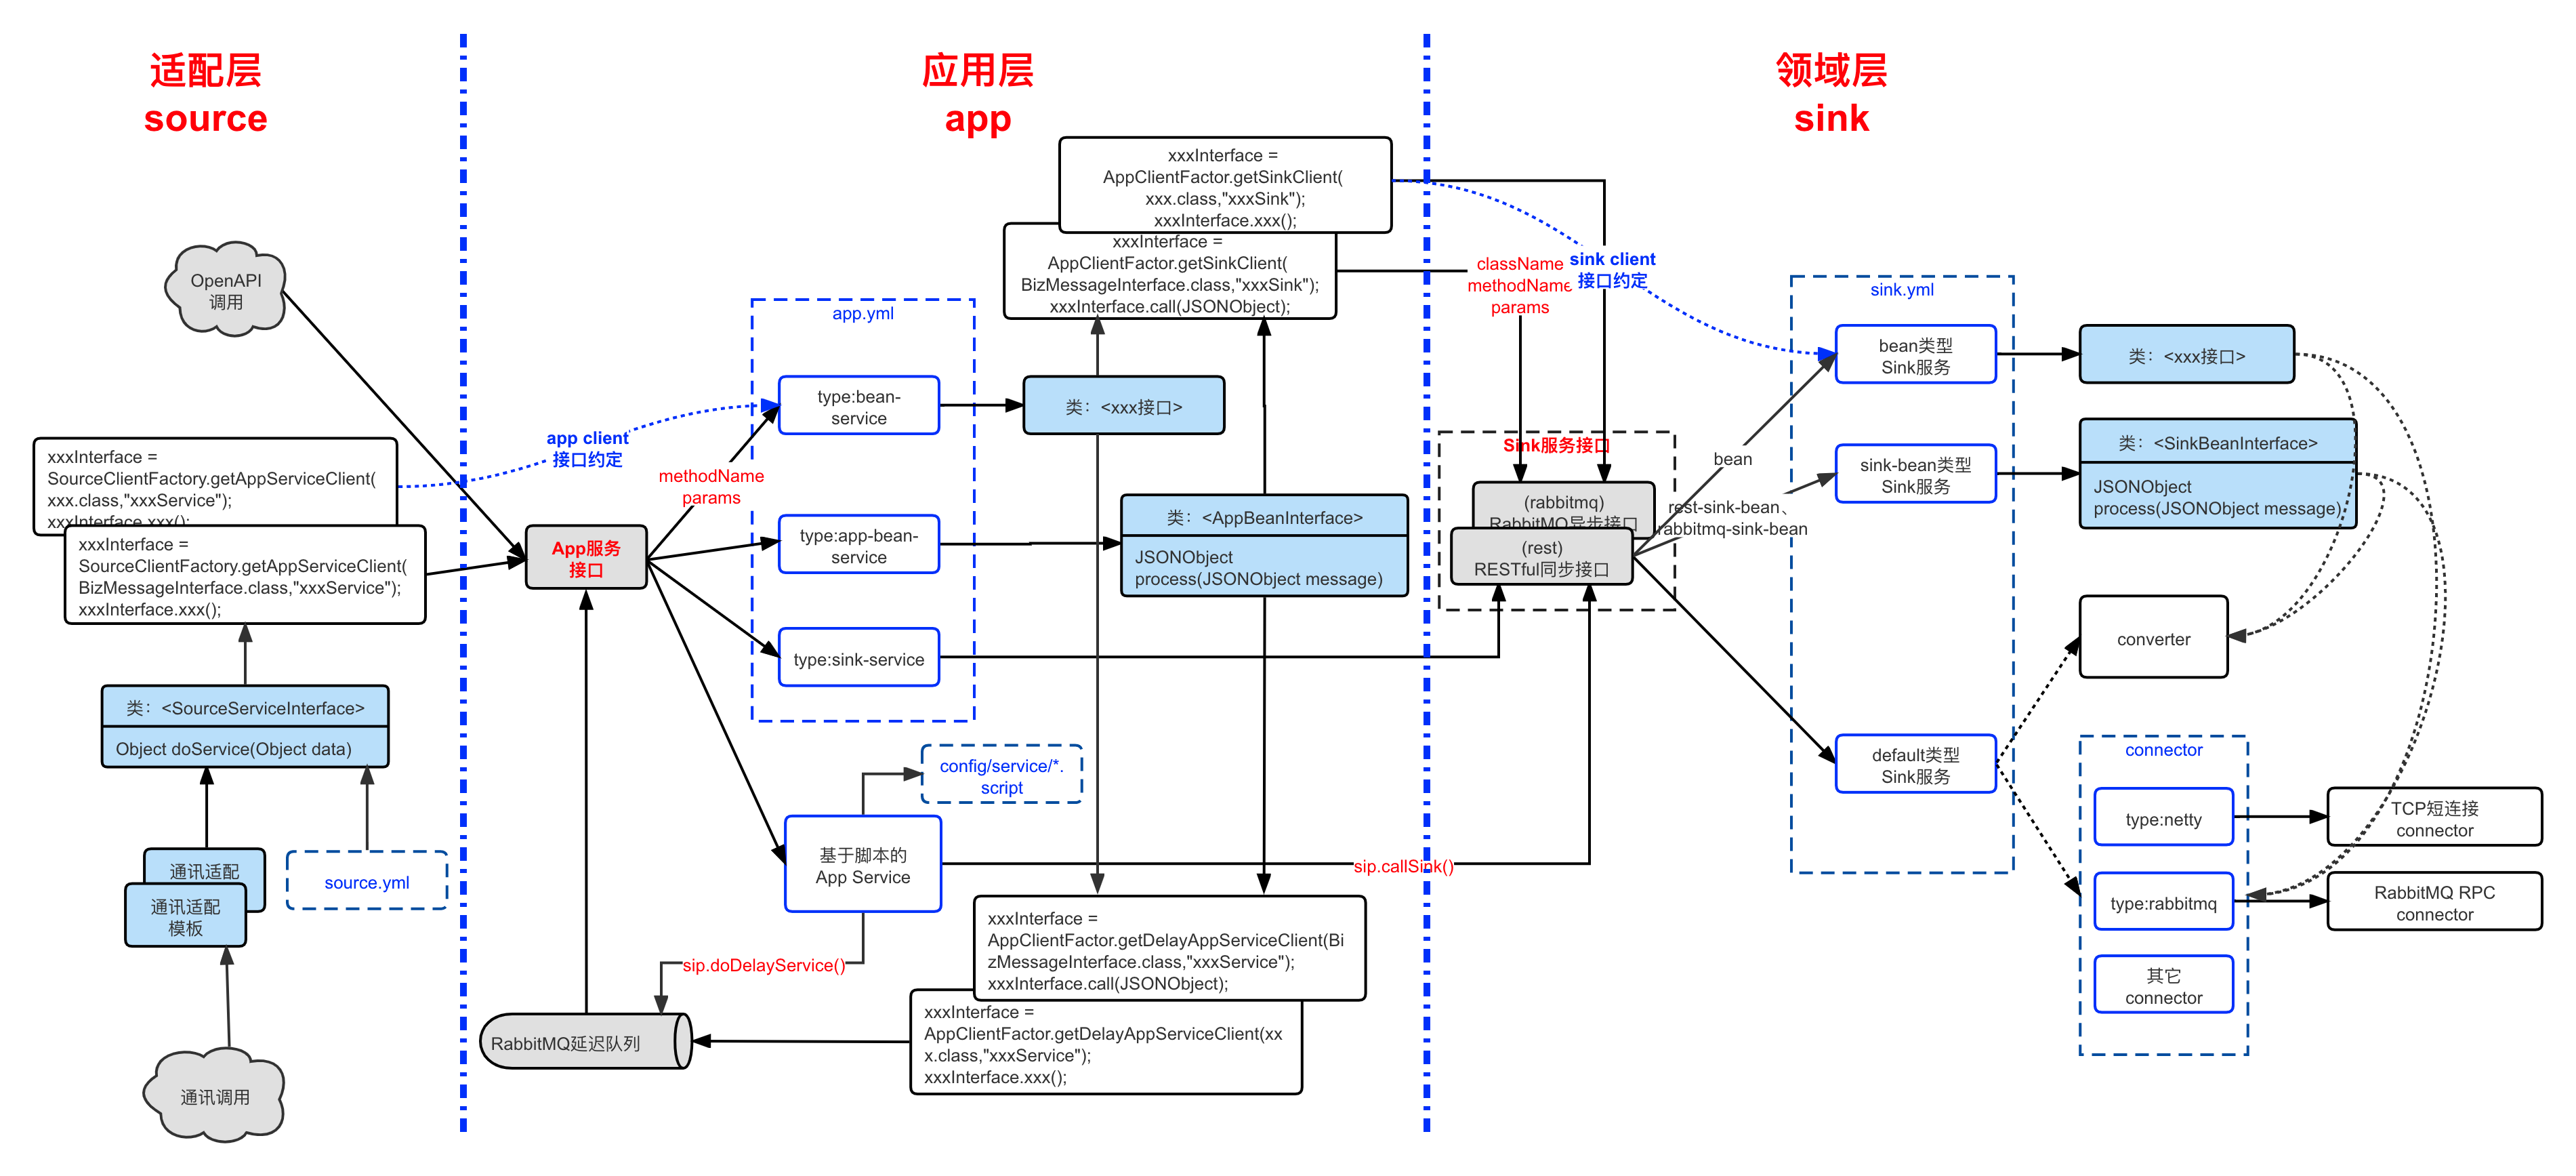
上图中蓝底黑字所呈现的部分,就是需要Java代码开发的,涉及适配(source)层、应用(app)层和领域(sink)层。蓝色虚箭头线所涉及的接口,就是不同层次之间需要互相依赖的接口定义。
二、source层
Source服务位于适配层,主要功能是接入外部发起的服务,主要功能有:
- 通讯适配:和外部接入通讯方式的适配,接收外部发起的请求消息,并把处理过后的响应消息送回。
- 消息转换:把外部发来的请求消息,转换成Biz-SIP平台内部消息格式;并把平台的响应消息,打包成外部的消息格式。
- app服务调用:往后调用app层服务。
- 渠道接入的安全处理,包括报文加解密、加签解签;
- 渠道接入的报文校验;
- 渠道接入的交易处理,包括流水记录、风控处理、终端管理等;
1. pom.xml配置
在pom.xml文件中添加source-spring-boot-starter依赖,以及应用聚合层app模块和领域层sink模块相关联的client接口相关包:
        <dependency>
            <groupId>com.bizmda.bizsip</groupId>
            <artifactId>source-spring-boot-starter</artifactId>
        </dependency>
2. application.yml配置
Source模块的application.yml中的主要相关参数:
| 配置项 | 配置说明 |
|---|---|
| bizsip.config-path | Biz-SIP中间件配置文件根目录位置 |
| bizsip.integrator-url | App服务聚合器的接口url地址 |
例子:
server:
  port: 8080

spring:
  application:
    name: bizsip-sample-source

  cloud:
    nacos:
      discovery:
        server-addr: bizsip-nacos:8848

bizsip:
  config-path: /var/bizsip/config
  integrator-url: http://bizsip-integrator/api

logging:
  level:
    com.bizmda.bizsip: debug
3. Source模块开发
Source模块主要负责通讯接入的适配、消息解包、消息打包、调用App服务,以及其它个性化处理。
3.1 通讯接入的适配
针对不同的通讯接入方式,source层会采用不同的接入方式,主要有:
- Controller:接入http的请求,包括RESTful报文请求接入;
- Netty:接入TCP协议的请求;
- RabbitMQ:实现异步转换成同步的接入;
- 等等…
3.2 source模块打包和解包
平台提供JSON、XML、定长、有分隔符、ISO8583的格式转换器(converter),如果采用这些平台提供的converter,就需要约定Source ID。
首先,应在在source.yml中配置相应的converter:
- id: xml-source
  converter:
    type: simple-xml
然后,就可以在代码中通过Converter.getSourceConverter()绑定converter,进行相应的解包和打包操作:
@RestController
@RequestMapping("/personal")
public class XmlController {
    ......
    // 获取source层消息转换句柄
    private Converter converter = Converter.getSourceConverter("xml-source");

    @PostMapping(value = "/getCustomerAndAccountList", consumes = "application/xml", produces = "application/xml")
    public String getCustomerAndAccountList(@RequestBody String inMessage) throws BizException {
        // 消息解包操作
        JSONObject jsonObject = this.converter.unpack(inMessage.getBytes());
        String customerId = (String)jsonObject.get("customerId");
        CustomerAndAccountList customerAndAccountList = this.personalAppInterface.getCustomerAndAccountList(customerId);
        jsonObject = JSONUtil.parseObj(customerAndAccountList);
        // 消息打包并返回
        return new String(this.converter.pack(jsonObject));
    }
  	...
 }
如果采用Java编程实现报文打解包,就可以不考虑Source ID的约定。
3.3 交易处理
对于简单的交易处理,可以考虑用Spring Service来做交易处理。
在编码时注意,调用app层聚合服务可能会导致时延较长,应避免在有数据库操作的Spring Service类中调用app层聚合服务,并在有数据库操作的Spring Service类上尽量加@Transactional,以避免长时间锁表。
3.4 调用app层服务
统一采用“SourceClientFactory.getAppServiceClient(Class
- 接口约定调用:由app层定义接口调用的Interface接口类,由渠道接入模块所引用。如下例所示:
@RestController
@RequestMapping("/personal")
public class PersonalController  {
    private PersonalAppInterface personalAppInterface = SourceClientFactory
            .getAppServiceClient(PersonalAppInterface.class,"app/personal");
	...

    @GetMapping(value ="/getCustomerAndAccountList")
    public CustomerAndAccountList getCustomerAndAccountList(String customerId) {
        return this.personalAppInterface.getCustomerAndAccountList(customerId);
    }

    @GetMapping(value ="/getAccountListByCustomerId")
    public List<Account> getAccountListByCustomerId(String customerId) {
        return this.personalAppInterface.getAccountListByCustomerId(customerId);
    }

    @GetMapping(value ="/getCustomer")
    public Customer getCustomer(String customerId) {
        return this.personalAppInterface.getCustomer(customerId);
    }
	...
}
- 非接口约定调用:采用平台通用JSONObject类型,Interface接口类统一采用BizMessageInterface接口类,并统一用call()来调用app层聚合服务。如下例所示:
@RestController
@RequestMapping("/personal")
public class PersonalController  {
    private BizMessageInterface payment1SinkInterface = SourceClientFactory
            .getAppServiceClient(BizMessageInterface.class,"sink/payment1");
    ...

    @GetMapping(value ="/send2Payment")
    public BizMessage<JSONObject> send2Payment(String message) throws BizException {
        JSONObject jsonObject = new JSONObject();
        jsonObject.set("message",message);
        return this.payment1SinkInterface.call(jsonObject);
    }
}
4. 可复用Source模块代码框架
Source模块负责外部应用的接入,外部应用的通讯接入模块,理论上是可复用的,可复用Source模块代码框架,是把通用的Source通讯适配应用和个性化的Source服务分开,从而达到通讯接入模块可复用的目标,如下所示:
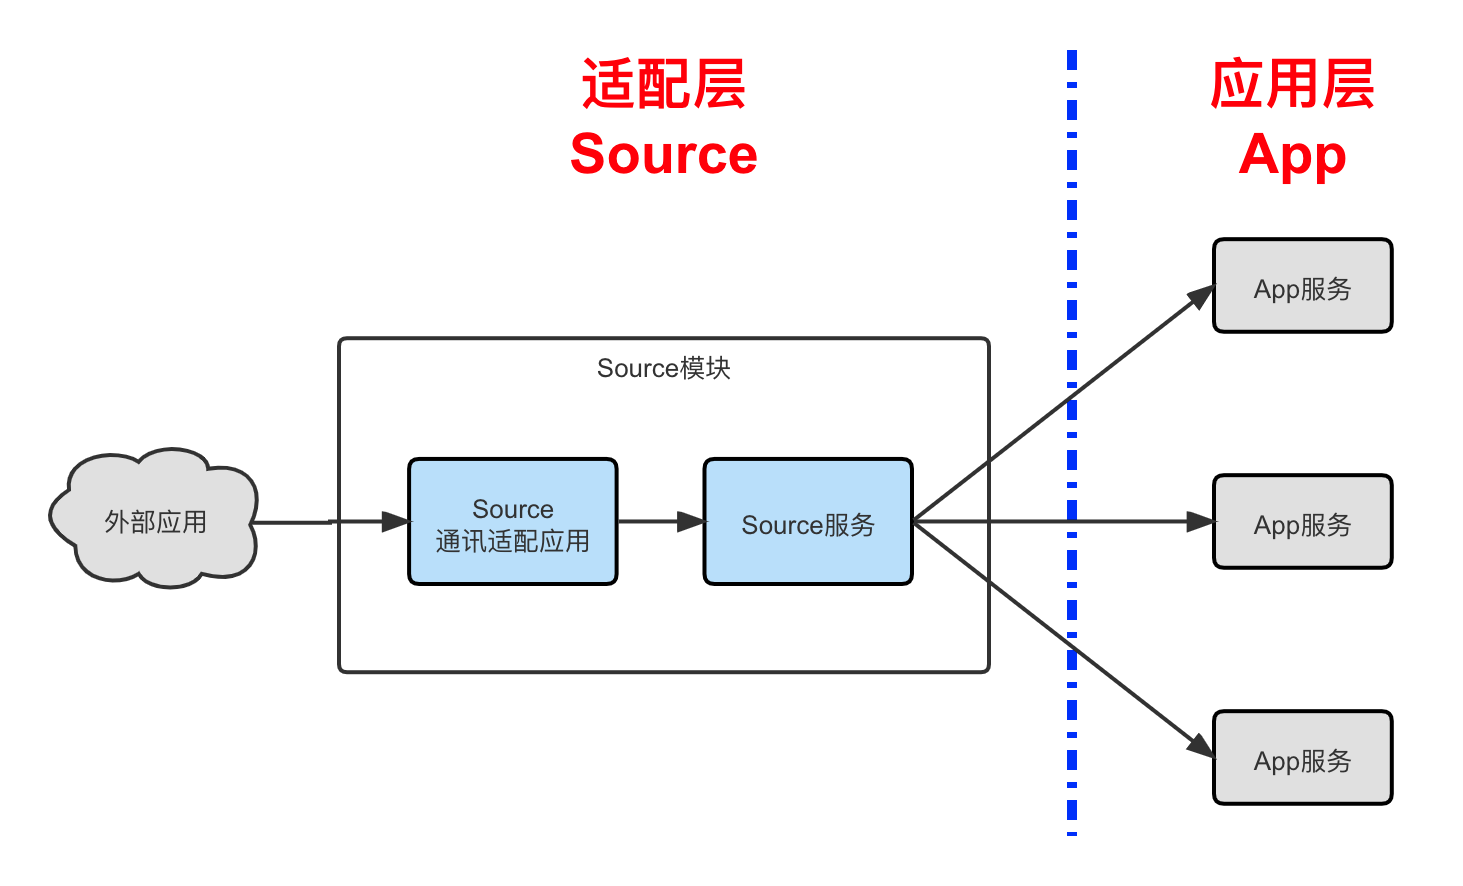
可复用Source模块框架中包括Source通讯适配应用和Source服务二块:
- Source通讯适配应用:主要负责和外部应用的通讯连接,根据不同的通讯方式可以选择不同的通讯适配应用来对接,通讯适配应用后续会不断扩展,可以选择已有的Source通讯适配应用,也可以在此框架上,开发自己的Source通讯适配应用。
- Source服务:是被Source通讯适配应用调用的Spring容器类,一般是实现SourceServiceInterface接口的doService()方法,在此方法中完成消息解包、消息打包、App服务调用等步骤。
SourceServiceInterface接口如下:
/**
 * Source服务接口
 */
public interface SourceServiceInterface {
    /**
     *
     * @param data 传入Source服务的数据
     * @return Source服务返回数据
     * @throws BizException
     */
    Object doService(Object data) throws BizException;
}
在可复用的Source模块中,可以通过@Autowired进行注入引用,从而实现通用的Source通讯适配应用和个性化的Source服务代码分离的目标:
@RestController
public class RestSourceController {
    @Autowired
    private SourceBeanInterface restSourceService;
5. 典型的可复用Source模块介绍
在source模块下,有Netty和RESTful接入的source模块,可以参考:
├── source      Source服务接入子模块
│   ├── netty-source		Netty接入Source子模块
│   ├── rest-source			Restful接入Source
3.1 rest-source模块(基于JSON格式POST请求的RESTful服务)
rest-source模块是提交JSON格式的POST请求,模块获取POST的JSON报文和HTTP请求头的信息,提交给Source服务进行处理。
doService()接口描述:
- 参数:RestSourceDTO对象
public class RestSourceDTO {
    // HTTP请求头Map
    private Map<String,String> headerMap;
    // 上送的JSON报文
    private JSONObject jsonObjectData;
}
- 返回:JSONObject
3.2 netty-source模块(基于Netty的同步短连接)
netty-source模块是基于Netty的TCP服务端接入,涉及application.yml配置:
netty:
  port: 10002
netty.port为TCP服务端的侦听端口。
doService()接口描述:
- 参数:byte[]
- 返回:byte[]
6. OpenAPI接口的开发建议
OpenAPI接口模块主要功能:
- 敏感数据加解密及报文加签验签;
- RESTful接口封装;
- OpenAPI接口文档的生成;
- Sandbox;
- 聚合服务的调用
OpenAPI接口模块如下例:
@RestController
@RequestMapping("/personal")
public class OpenapiController {
    private PersonalAppInterface personalAppInterface = SourceClientFactory
            .getBizServiceClient(PersonalAppInterface.class,"app/personal");
    private BizMessageInterface payment1SinkInterface = SourceClientFactory
            .getBizServiceClient(BizMessageInterface.class,"sink/payment1");

    @GetMapping(value ="/getCustomerAndAccountList")
    public CustomerAndAccountList getCustomerAndAccountList(String customerId) {
        return this.personalAppInterface.getCustomerAndAccountList(customerId);
    }

    @GetMapping(value ="/getAccountListByCustomerId")
    public List<Account> getAccountListByCustomerId(String customerId) {
        return this.personalAppInterface.getAccountListByCustomerId(customerId);
    }

    @GetMapping(value ="/getCustomer")
    public Customer getCustomer(String customerId) {
        return this.personalAppInterface.getCustomer(customerId);
    }

    @GetMapping(value ="/getCustomerAndSaf2Payment2")
    public Customer getCustomerAndSaf2Payment2(String tranCode, String customerId) throws BizException {
        return this.personalAppInterface.getCustomerAndSaf2Payment2(tranCode,customerId);
    }

    @GetMapping(value ="/send2Payment1")
    public BizMessage<JSONObject> send2Payment1(String message) throws BizException {
        return this.personalAppInterface.send2Payment1(message);
    }

    @GetMapping(value ="/send2Payment")
    public BizMessage<JSONObject> send2Payment(String message) throws BizException {
        JSONObject jsonObject = new JSONObject();
        jsonObject.set("message",message);
        return this.payment1SinkInterface.call(jsonObject);
    }
}
OpenAPI接口模块可以根据接口要求开发controller类,并加上API注释,自动生成Swagger/Knife4j文档。
三、app层
app层服务功能:
- 领域层服务(Sink服务)的编排
- 领域层服务(Sink服务)透传到适配层服务(Source服务和OpenAPI)
- 存储转发服务的封装
- 补偿交易的封装
1. pom.xml配置
在pom.xml文件中添加app-spring-boot-starter依赖(1.0.0.Beta8版本之前是依赖integrator-spring-boot-starter),以及领域层sink模块相关联的client接口相关包:
        <dependency>
            <groupId>com.bizmda.bizsip</groupId>
            <artifactId>app-spring-boot-starter</artifactId>
        </dependency>
2. application.yml配置
app模块中的application.yml中的主要相关参数:
| 配置项 | 配置说明 |
|---|---|
| bizsip.config-path | Biz-SIP中间件配置文件根目录位置 |
| bizsip.rabbitmq-log | success:会把交易日志(成功)发送给rabbitMQ suspend:会把交易日志(成功、挂起)发送给rabbitMQ fail:会把交易日志(成功、挂起、失败)发送给rabbitMQ 交易日志的rabbitMQ相关发送参数: - exchange:exchange.direct.bizsip.log - RoutingKey:queue.log.routing.key |
| server.port | App服务整合器的微服务端口,建议用8888端口,避免和其它端口相冲突 |
| spring.cloud.nacos.discovery.server-addr | Nacos服务端口 |
| spring.datasource.* | 数据库连接配置(用于服务脚本中db对象) |
| spring.redis.* | redis连接配置(用于服务脚本中redis对象) |
| spring.rabbitmq.* | RabbitMQ配置(用于事务管理器) |
例子:
server:
  port: 8888

spring:
  application:
    name: bizsip-integrator

  cloud:
    nacos:
      discovery:
        server-addr: bizsip-nacos:8848
#  以下配置在Istio部署中打开,以不采用NACOS注册中心,而采用etcd注册机制
#  cloud:
#    service-registry:
#      auto-registration:
#        enabled: false  #禁用注册中心服务

  datasource:
    url: jdbc:mysql://bizsip-mysql/sip
    username: root
    password: bizsip123456
    driver-class-name: com.mysql.jdbc.Driver

  redis:
    redisson:
      enable: true
    host: bizsip-redis
    port: 6379
    timeout: 6000
    database: 0
    lettuce:
      pool:
        max-active: 10 # 连接池最大连接数(使用负值表示没有限制),如果赋值为-1,则表示不限制;如果pool已经分配了maxActive个jedis实例,则此时pool的状态为exhausted(耗尽)
        max-idle: 8   # 连接池中的最大空闲连接 ,默认值也是8
        max-wait: 100 # # 等待可用连接的最大时间,单位毫秒,默认值为-1,表示永不超时。如果超过等待时间,则直接抛出JedisConnectionException
        min-idle: 2    # 连接池中的最小空闲连接 ,默认值也是0
      shutdown-timeout: 100ms

  rabbitmq:
    virtual-host: /
    host: bizsip-rabbitmq
    port: 5672
    username: springcloud
    password: springcloud
    listener:
      simple:
        concurrency: 5
        max-concurrency: 15
        prefetch: 10

bizsip:
  config-path: /var/bizsip/config
	rabbitmq-log: fail

logging:
  level:
    com.bizmda.bizsip: debug
3. 二种app服务类型
聚合应用服务和延迟服务,有二种服务类型:bean-service和app-bean-service。
3.1 基于自定义接口类的bean-service
bean-service:基于Java接口类调用的服务类型,绑定的服务类是基于预先约定好的Java接口。
bean-service在App层服务配置文件(app.yml)中,如下例所示:
app.yml:
- app-service-id: app/sample-bean-service
  type: bean-service
  class-name: com.sample.app.service.SampleBeanService
具体的bean-service代码,要求是一个Spring Service容器类,实现一个约定的App层服务接口,如下例所示:
@Service
public class SampleBeanService implements SampleBeanServiceInterface {
    private BizMessageInterface sampleSinkBeankSinkInterface = AppClientFactory
            .getSinkClient(BizMessageInterface.class,"sample-sink-bean-sink");
    private HelloInterface helloInterface = AppClientFactory
            .getSinkClient(HelloInterface.class,"sample-bean-sink");
    @Override
    public String callSampleSinkBeanSink(String message) {
        JSONObject jsonObject = new JSONObject();
        jsonObject.set("message",message);
        BizMessage<JSONObject> bizMessage;
        try {
            bizMessage = sampleSinkBeankSinkInterface.call(jsonObject);
        } catch (BizException e) {
            e.printStackTrace();
            return null;
        }
        return (String)bizMessage.getData().get("message");
    }

    @Override
    public String callSampleBeanSink(String message) {
        return this.helloInterface.hello(message);
    }
}
3.2 基于平台内部JSON消息接口的app-bean-service
app-bean-service:基于平台标准JSON接口调用的服务类型,绑定的服务类是继承AppBeanInterface接口。
app-bean-service在App层服务配置文件(app.yml)中,如下例所示:
app.yml:
- app-service-id: app/sample-app-bean-service
  type: app-bean-service
  class-name: com.sample.app.service.SampleAppBeanService
具体的app-bean-service代码,要求是一个Spring Service容器类,实现AppBeanInterface接口,如下例所示:
@Service
public class SampleAppBeanService implements AppBeanInterface {
    private HelloInterface helloInterface = AppClientFactory
            .getSinkClient(HelloInterface.class,"sample-bean-sink");

    @Override
    public JSONObject process(JSONObject jsonObject) throws BizException {
        String message = (String)jsonObject.get("message");
        jsonObject.set("message","sample-app-bean-service: Hello,"+message+";"
                + this.helloInterface.hello(message));
        return jsonObject;
    }
}
4. 调用Sink服务
统一采用“AppClientFactory.getSinkClient(Class
- 自定义接口调用:由app层定义接口调用的Interface接口类,由渠道接入模块所引用。如下例所示:
@Service
public class PersonalAppService implements PersonalAppInterface {
    private AccountSinkInterface accountSinkInterface = AppClientFactory
            .getSinkClient(AccountSinkInterface.class,"account-sink");
    private CustomerSinkInterface customerSinkInterface = AppClientFactory
            .getSinkClient(CustomerSinkInterface.class,"customer-sink");
	...

    @Override
    public CustomerAndAccountList getCustomerAndAccountList(String customerId) {
        Customer customer = this.customerSinkInterface.getCustomer(customerId);
        List<Account> accountList = this.accountSinkInterface.getAccountListByCustomerId(customerId);
        CustomerAndAccountList customerAndAccountList = new CustomerAndAccountList();
        customerAndAccountList.setCustomer(customer);
        customerAndAccountList.setAccountList(accountList);
        return customerAndAccountList;
    }
	...
}
- 平台标准接口调用:采用平台通用JSONObject类型,Interface接口类统一采用BizMessageInterface接口类,并统一用call()来调用app层聚合服务。如下例所示:
@Service
public class PersonalAppService implements PersonalAppInterface {
	...
    private BizMessageInterface payment1SinkInterface = AppClientFactory
            .getSinkClient(BizMessageInterface.class,"payment1-sink");
    private BizMessageInterface payment2SinkInterface = AppClientFactory
            .getSinkClient(BizMessageInterface.class,"payment2-sink");
	...
    @Override
    public BizMessage<JSONObject> send2Payment1(Object message) throws BizException {
        JSONObject jsonObject = new JSONObject();
        jsonObject.set("message",message);
        return this.payment1SinkInterface.call(jsonObject);
    }

    @Override
    public BizMessage send2Payment2(String tranMode, String tranCode, Object message) throws BizException {
        JSONObject jsonObject = new JSONObject();
        jsonObject.set("tranCode",tranCode);
        jsonObject.set("tranMode",tranMode);
        jsonObject.set("message",message);
        return this.payment2SinkInterface.call(jsonObject);
    }
    ...
}
5. 调用延迟App服务
延迟服务也是位于app层的聚合服务,延迟服务只能由app层的聚合服务来进行嵌套调用,不能从适配层直接调用延迟服务。
App调用延迟服务,统一采用“AppClientFactory.getDelayAppServiceClient(Class
@Service
public class PersonalAppService implements PersonalAppInterface {
    private AccountSinkInterface accountSinkInterface = AppClientFactory
            .getSinkClient(AccountSinkInterface.class,"account-sink");
    private CustomerSinkInterface customerSinkInterface = AppClientFactory
            .getSinkClient(CustomerSinkInterface.class,"customer-sink");
    private BizMessageInterface payment1SinkInterface = AppClientFactory
            .getSinkClient(BizMessageInterface.class,"payment1-sink");
    private BizMessageInterface payment2SinkInterface = AppClientFactory
            .getSinkClient(BizMessageInterface.class,"payment2-sink");
    private PersonalAppInterface personalAppDelayInterface = AppClientFactory
            .getDelayAppServiceClient(PersonalAppInterface.class,"app/personal",
                    0,1000,2000,4000,8000,16000,32000);
	...
    @Override
    public void payoutForward(String tranMode,String accountId, long amount) throws BizException {
        log.info("account出金:{},{}",accountId,amount);
        this.accountSinkInterface.payout(accountId,amount);
        JSONObject jsonObject = new JSONObject();
        jsonObject.set("tranCode","pay");
        jsonObject.set("tranMode",tranMode);
        jsonObject.set("accountId",accountId);
        jsonObject.set("tranAmount",amount);
        BizMessage<JSONObject> bizMessage = null;
        try {
            log.info("payment缴费...");
            bizMessage = this.payment2SinkInterface.call(jsonObject);
        } catch (BizException e) {
            if (e.isTimeOutException()) {
                log.info("payment交易超时,开始payout补偿...");
                this.personalAppDelayInterface.payoutForwardCompensate(jsonObject);
                return;
            }
            else {
                throw e;
            }
        }
        log.info("payment缴费成功!");
        log.info("payout成功!");
    }
}
6. App服务入口报文校验
在app层中,有对app层服务的校验机制,包括域级校验和服务级校验,可以考虑统一在app层进行报文检验配置:
config/check-rule/openapi/sample1.yml

field-check-rules:
  - field: email
    rule: isEmail
    message: '不是邮箱地址:{}'
  - field: sex
    rule: notEmpty
    message: '不能为空'
  - field: mobile
    rule: isMatchRegex
    args:
      - '^[1][3,4,5,6,7,8,9][0-9]{9}$'
    message: '不是手机号{}'
field-check-mode: one
service-check-rules:
  - script: if(data.sex == '1')
            {return '性别不符合!';}
    message: '额度超限'
service-check-mode: one
但如果是仅针对于该特定渠道的报文校验,就只能考虑在渠道接入模块做个性化处理。
四、sink层
sink层主要包括二类模块:第三方接入模块和交易处理模块:
- 第三方系统接入模块,会涉及第三方应用的调用,包括同步调用和异步调用。
- 交易处理模块就是一种特殊的Sink模块,是通过connector接收RestController发来的服务请求,并进行一系列内部交易处理后返回,不涉及第三方应用的调用。
1. pom.xml配置
在pom.xml文件中添加sink-spring-boot-starter依赖:
        <dependency>
            <groupId>com.bizmda.bizsip</groupId>
            <artifactId>sink-spring-boot-starter</artifactId>
        </dependency>
2. application.yml配置
领域层Sink应用的application.yml中的主要相关参数:
| 配置项 | 配置说明 |
|---|---|
| bizsip.config-path | Biz-SIP中间件配置文件根目录位置 |
| bizsip.sink-id(可选) | sink-id可以配置多个以“,”号分隔的id,应用会自动加载根据sink.yml中对应sink id的sink服务(包括rest同步sink服务调用、rabbitmq异步sink服务调用) |
| bizsip.rabbitmq-log | success:会把交易日志(成功)发送给rabbitMQ suspend:会把交易日志(成功、挂起)发送给rabbitMQ fail:会把交易日志(成功、挂起、失败)发送给rabbitMQ 交易日志的rabbitMQ相关发送参数: - exchange:exchange.direct.bizsip.log - RoutingKey:queue.log.routing.key |
如下例:
server:
  port: 8001
spring:
  application:
    name: customer-sink

  cloud:
    nacos:
      discovery:
        server-addr: bizsip-nacos:8848

  datasource:
    url: jdbc:mysql://bizsip-mysql/xbank?autoReconnect=true
    username: root
    password: bizsip123456
    driver-class-name: com.mysql.cj.jdbc.Driver

bizsip:
  config-path: /var/bizsip/config
  sink-id: sink1,sink2,sink3,sink4,sink5,sink6,sink7,sink9,sink10,sink11,sink12,sink13,sink14,netty,sink15,sink22,sink23,sink24,sink25
  rabbitmq-log: success

logging:
  level:
    com.bizmda.bizsip: debug
    com.xbank: trace
3. Sink服务调用方式
在sink.yml中,每个sink都需要定义type属性,约定针对此sink服务的调用方式,type属性包括:
- rest:通过RESTful同步调用Sink服务;
- rabbitmq:通过RabbitMQ异步调用Sink服务。
3.1 rest(同步调用Sink服务)
Sink模块是通过RESTful接口来接收app层发来的同步服务请求,主要有二种方式:
- 一是可以直接在application.yml中配置bizsip.sink-id属性,在application启动时扫描sink.yml中配置的sink,对于type属性为“rest”的sink,会根据sink.yml中对应sink的url属性自动接入path点。
application.yml中应配置bizsip.sink-id属性:
bizsip:
  sink-id: sink1,sink2,sink3,sink4,sink5,sink6
- 二是可以直接写RestController,以获得更灵活的定制:
@RestController
public class Sink2Controller {
    private Converter converter = Converter.getSinkConverter("sink2");
    private Connector connector = Connector.getSinkConnector("sink2");

    @PostMapping(value = "/sink2", consumes = "application/json", produces = "application/json")
    public BizMessage<JSONObject> doService(@RequestBody BizMessage<JSONObject> inMessage, HttpServletResponse response) {
        log.debug("inMessage:{}", inMessage);
        try {
            byte[] packedMessage = this.converter.pack(inMessage.getData());
            byte[] returnMessage = this.connector.process(packedMessage);
            JSONObject jsonObject = this.converter.unpack(returnMessage);
            return BizMessage.buildSuccessMessage(inMessage,jsonObject);
        } catch (BizException e) {
            log.error("服务端适配器执行出错",e);
            return BizMessage.buildFailMessage(inMessage,e);
        }
    }
}
从上面的例子可以看出,在开发的RestController中,可以灵活地进行消息解包、调用配置的connector,最后消息打包返回。
3.2 rabbitmq(异步调用Sink服务)
type属性为rabbitmq的Sink模块,是通过RabbitMQ消息队列,来接收app层发来的异步服务请求,主要有二种方式:
- 一是可以直接在application.yml中配置bizsip.sink-id属性,在application启动时扫描sink.yml中配置的sink,对于rabbbitmq型的sink,会根据sink.yml中对应sink的exchange、routing-key、queue来约定Rabbitmq消息传递的exchange、routing key,以及绑定的接收队列(exchange缺省为exchange.dircect.bizsip.sink,routing key缺省为对应的sink id,绑定queue缺省为queue.bizsip.sink.{sink id})。
- 二是可以自己开发SinkRabbitmqListener,以获得更灵活的定制,具体写法可以参考SinkRabbitmqListener源码:
@Service
@ConditionalOnProperty(name = "bizsip.rabbitmq.queue",matchIfMissing = false)
public class SinkRabbitmqListener {
    @Value("${bizsip.sink-id}")
    private String sinkId;
    @Value("${bizsip.rabbitmq.queue}")
    private String queue;
    @Value("${bizsip.rabbitmq.exchange}")
    private String exchange;
    @Value("${bizsip.rabbitmq.routing-key}")
    private String routingKey;

    @Value("${bizsip.rabbitmq-log:false}")
    private boolean rabbitmqLog;

    private Converter converter = null;
    private Connector connector = null;

    @Autowired
    private RabbitTemplate rabbitTemplate;
    private Jackson2JsonMessageConverter jackson2JsonMessageConverter =new Jackson2JsonMessageConverter();

    @PostConstruct
    public void init() {
        if (this.exchange == null) {
            log.error("配置文件中bizsip.rabbitmq.exchange没有配置,SinkRabbitmqListener初始化失败!");
        }
        if (this.queue == null) {
            log.error("配置文件中bizsip.rabbitmq.queue没有配置,SinkRabbitmqListener初始化失败!");
        }
        if (this.routingKey == null) {
            log.error("配置文件中bizsip.rabbitmq.routing-key没有配置,SinkRabbitmqListener初始化失败!");
        }
        if (this.sinkId == null) {
            log.error("配置文件中bizsip.sink-id没有配置,SinkRabbitmqListener初始化失败!");
            return;
        }
        this.converter = Converter.getSinkConverter(this.sinkId);
        this.connector = Connector.getSinkConnector(this.sinkId);
    }

    @RabbitListener(bindings = @QueueBinding(
            value = @Queue(value = "${bizsip.rabbitmq.queue}", durable = "true", autoDelete = "false"),
            exchange = @Exchange(value = "${bizsip.rabbitmq.exchange}", type = ExchangeTypes.DIRECT),
            key = "${bizsip.rabbitmq.routing-key}"))
    public void doService(Message message) {
        BizMessage<JSONObject> inMessage;
        inMessage = (BizMessage) jackson2JsonMessageConverter.fromMessage(message);
        if (!(inMessage.getData() instanceof JSONObject)) {
            inMessage.setData(JSONUtil.parseObj(inMessage.getData()));
        }
        JSONObject jsonObject = inMessage.getData();
        try {
            jsonObject = this.process(jsonObject);
            this.sendSuccessLog(inMessage,BizMessage.buildSuccessMessage(inMessage,jsonObject));
        } catch (BizException e) {
            this.sendFailLog(inMessage,BizMessage.buildFailMessage(inMessage,e));
        }
    }

    ......
}
4. Sink服务处理方式
sink.yml中可以约定每个sink的服务处理方式,这是通过sink的processor属性来设置的,processor包括以下属性值:
- default:采用缺省的、无代码开发的的处理方式;
- sink-bean:通过编写平台标准接口的Spring容器类(实现SinkBeanInterface接口)来进行处理;
- bean:通过编写实现自定义接口的Spring容器类来进行处理。
4.1 default
在sink.yml中sink的processor设置为default时,sink服务是采用默认的缺省Sink服务流程来处理的,无需任何代码开发,处理流程如下:

4.2 sink-bean
在sink.yml中sink的processor设置sink-bean时,sink服务是会调用实现sink-bean接口(SinkBeanInterface接口)的sink-bean服务类(要求为Spring容器类),具体类名是由sink.yml中当前sink的class-name来指定的。
在sink-bean服务类中,可以调用sink.yml中配置的connector和converter,如果sink-bean服务类是继承AbstractSinkService类,当前sink的connector和converter是会自动注入的。
sink-bean服务类如下例所示:
@Service
public class Payment1SinkService extends AbstractSinkService implements SinkBeanInterface {
    @Override
    public JSONObject process(JSONObject jsonObject) throws BizException {
        log.info("传入消息:\n{}", BizUtils.buildJsonLog(jsonObject));
        byte[] inBytes = this.converter.pack(jsonObject);
        log.info("打包后消息:\n{}", BizUtils.buildHexLog(inBytes));
        JSONObject outJsonObject = this.converter.unpack(inBytes);
        log.info("解包后消息:\n{}", BizUtils.buildJsonLog(outJsonObject));
        return outJsonObject;
    }
}
采用sink-bean服务,接口不用提前约定,扩展性强,但缺点也是很明显,调用双方缺乏接口约定的机制。
在交易类型超过5个时,建议采用Command Executor(命令处理程序),分成多个xxxCmdExe类来进行处理,这些类应统一继承AbstractSinkBeanCmdExe类,并统一在execute()中实现业务逻辑处理。
@Service
public class Payment2SinkService implements SinkBeanInterface {
    @Autowired
    private TimeoutCmdExe timeoutCmdExe;
    @Autowired
    private TimeoutAndFailCmdExe timeoutAndFailCmdExe;
    @Autowired
    private TimeoutAndSuccessCmdExe timeoutAndSuccessCmdExe;
    @Autowired
    private SuccessCmdExe successCmdExe;

    @Override
    public JSONObject process(JSONObject jsonObject) throws BizException {
        log.info("传入消息:\n{}", jsonObject.toString());
        AbstractSinkBeanCmdExe sinkBeanCmdExe;
        String tranMode = (String)jsonObject.get("tranMode");
        switch (tranMode) {
            case "timeout":
                // 收到交易后,永远返回超时
                return timeoutCmdExe.execute(jsonObject);
            case "3timeout-fail":
                // 收到交易后,前3次返回超时,第4次返回失败码
                return timeoutAndFailCmdExe.execute(jsonObject);
            case "3timeout-success":
                // 收到交易后,前3次返回超时,第4次成功返回原报文
                return timeoutAndSuccessCmdExe.execute(jsonObject);
            default:
                //其它情况,成功返回原报文
                return successCmdExe.execute(jsonObject);
        }
    }
}

Command Executor(命令处理程序)如下例:
@Service
public class SuccessCmdExe extends AbstractSinkBeanCmdExe {
    @Override
    public JSONObject execute(JSONObject jsonObject) throws BizException {
        String tranCode = (String)jsonObject.get("tranCode");
        log.info("交易:{},返回交易成功!",tranCode);
        return jsonObject;
    }
}
4.3 bean
在sink.yml中sink的processor设置为bean时,sink服务是会调用实现基于开发者自己约定接口实现的bean服务类(要求为Spring容器类),具体类名是由sink.yml中当前sink的class-name来指定的。
在bean服务类中,可以调用sink.yml中配置的connector和converter,如果bean服务类是继承AbstractSinkService类,当前sink的connector和converter是会自动注入的。
bean服务代码如下例所示:
@Service
public class SampleBeanService implements HelloInterface {
    @Override
    public String hello(String message) {
        return "sample-bean-sink: Hello," + message;
    }
}
bean服务接口明确清晰,调用方一目了然,但需要调用双方提前约定Interface接口类。
在交易类型超过5个时,建议采用Command Executor(命令处理程序),分成多个xxxCmdExe类来进行处理,这些类应统一继承AbstractBeanCmdExe类。
@Service
public class AccountSinkService implements AccountSinkInterface {
    @Autowired
    private PayoutCmdExe payoutCmdExe;
    @Autowired
    private  PayoutCompensationCmdExe payoutCompensationCmdExe;
    @Autowired
    private GetAccountListByCustomerIdCmdExe getAccountListByCustomerIdCmdExe;

    @Override
    public List<Account> getAccountListByCustomerId(String customerId) {
        return this.getAccountListByCustomerIdCmdExe.getAccountListByCustomerId(customerId);
    }

    @Override
    public Account payout(String accountId, long amount) {
        return this.payoutCmdExe.payout(accountId,amount);
    }

    @Override
    public Account payoutCompensation(String accountId, long amount) {
        return this.payoutCompensationCmdExe.payoutCompensation(accountId,amount);
    }
}

Command Executor(命令处理程序)如下例:
@Service
public class GetAccountListByCustomerIdCmdExe extends AbstractBeanCmdExe {
    @Autowired
    private AccountService accountService;

    public List<Account> getAccountListByCustomerId(String customerId) {
        QueryWrapper<Account> queryWrapper=new QueryWrapper();
        queryWrapper.eq("customer_id",customerId);
        return this.accountService.list(queryWrapper);
    }
}
5. sink模块中的打包和解包
不管采用平台内置的RestControlller,还是开发者自己写的RestController,都会进行报文消息的打包和解包。
下例是开发者自己写的RestController,包含了消息打包和消息解包操作:
@RestController
public class Sink2Controller {
    private Converter converter = Converter.getSinkConverter("sink2");
    private Connector connector = Connector.getSinkConnector("sink2");

    @PostMapping(value = "/sink2", consumes = "application/json", produces = "application/json")
    public BizMessage<JSONObject> doService(@RequestBody BizMessage<JSONObject> inMessage, HttpServletResponse response) {
        log.debug("inMessage:{}", inMessage);
        try {
            // 消息打包
            byte[] packedMessage = this.converter.pack(inMessage.getData());
            // 调用connector处理
            byte[] returnMessage = this.connector.process(packedMessage);
            // 消息解包
            JSONObject jsonObject = this.converter.unpack(returnMessage);
            return BizMessage.buildSuccessMessage(inMessage,jsonObject);
        } catch (BizException e) {
            log.error("服务端适配器执行出错",e);
            return BizMessage.buildFailMessage(inMessage,e);
        }
    }
}
在上例中,converter会根据sink2的消息格式配置,调用接口进行消息打包和解包。当然,应在sink.yml中配置指定sink的converter:
- id: sink2
  type: rest
  url: http://bizsip-sample-sink/sink2
  converter:
    type: simple-json
  connector:
    type: sink-bean
    class-name: com.bizmda.bizsip.sample.sink.controller.ActServer
如果开发者想在connector中进行报文处理,可以配置和实现SinkBeanInterface接口的connector,这样就可以直接把RestController中收到的平台JSON报文,不在RestController中进行消息格式转换处理,直接通过connector的process()传入平台JSON报文进行处理。
五、交易日志监控
1. 交易日志监控配置
当app层在application.yml中设置bizsip.rabbitmq-log属性后,平台会把相关的交易日志发送给rabbitMQ消息中间件,发送队列参数:
- exchange:exchange.direct.bizsip.log
- routing key:key.bizsip.log
一般需要在以下二类应用启动时,配置application.yml中的bizsip.rabbitmq-log属性:
- App层的应用:所有的应用都是通过App层应用来进行服务编排的,需要设置rabbitmq-log交易日志监控级别,来对App层的App服务和App延迟服务进行全生命周期的监控;
- Sink层包括RabbitMQ异步Sink服务的应用:对于涉及RabbitMQ异步Sink服务的应用,也需要单独实现全生命周期的监控,也是需要设置rabbitmq-log交易日志监控级别的。
交易日志包括成功、失败、挂起三种状态,发送交易日志的时机和相关状态如下表:
| 交易日志状态 | 发送交易日志时机 | 收到后建议处理方式 |
|---|---|---|
| 0-App服务成功 | 1、app层服务执行成功后; 2、app层延迟服务执行成功后。 |
一般应进行交易成功的后续处理,但是应考虑到App延迟服务和Sink异步服务的情况,延迟服务是作为主服务的子交易(子交易的 parentTraceId为父交易的traceId),而且子交易的交易日志有可能会先于父交易的日志被接收到,应根据先期到达的子交易,进行父交易的后续处理。 |
| 1-App服务失败 | 1、app层服务执行失败后; 2、app层延迟服务执行失败后(不包括服务出现超时错误,并没有超过最大重试次数的情况); 3、app层延迟服务出现超时错误,但超过最大重试次数; |
一般应进行交易失败的后续处理。 |
| 2-App服务挂起 | app层延迟服务放入等待队列,直到被触发执行完成前,都为挂起状态。 | 一般不做处理,等待交易成功或失败后再行处理。 |
| 3-Sink服务成功 | sink异步服务执行成功后。 | 一般应进行交易成功的后续处理,Sink异步服务的交易日志有可能会先于App服务的交易日志被接收到。 |
| 4-Sink服务失败 | sink异步服务执行失败后。 | 一般应进行交易失败的后续处理。 |
bizsip.rabbitmq-log的设置属性包括:
- success:发送成功、挂起、失败类型的交易日志
- suspend:发送挂起、失败类型的交易日志
- fail:发送失败类型的交易日志
- 不设置或其它:不发送交易日志
接收到的交易日志,为Map数据类型,约定如下:
| KEY键 | 值类型 | 值说明 |
|---|---|---|
| type | int | 0-成功,1-失败,2-挂起 |
| request | BizMessage |
App服务的最初请求报文 |
| response | BizMessage |
App服务的最终响应报文 |
2. 交易日志监控应用开发
Biz-SIP平台在配置好后,会把相关的交易日志发送给rabbitMQ消息中间件,开发者可以开发RabbitMQ中间件客户端侦听应用,对收到的交易日志进行处理,相关队列侦听参数:
- exchange:exchange.direct.bizsip.log
- routing key:key.bizsip.log
交易日志监控应用例子,如下所示:
@Service
public class AppLogQueueListener {
    public static final String APP_LOG_QUEUE = "queue.bizsip.applog";
    private Jackson2JsonMessageConverter jackson2JsonMessageConverter =new Jackson2JsonMessageConverter();

    @RabbitListener(bindings = @QueueBinding(
            value = @Queue(value = APP_LOG_QUEUE, durable = "true", autoDelete = "false"),
            exchange = @Exchange(value = BizConstant.BIZSIP_LOG_EXCHANGE, type = ExchangeTypes.DIRECT, durable = "true", autoDelete = "false"),
            key = BizConstant.BIZSIP_LOG_ROUTING_KEY))
    public void process(Message message) {
        Map<String,Object> map = (Map<String,Object>)jackson2JsonMessageConverter.fromMessage(message);
        int type = (int)map.get("type");
        BizMessage<JSONObject> inBizMessage = new BizMessage<>((Map) map.get("request"));
        BizMessage<JSONObject> outBizMessage = new BizMessage<>((Map) map.get("response"));
        log.info("\ntype:{}\nrequest:\n{}\nresponse:\n{}",type,
                BizUtils.buildBizMessageLog(inBizMessage),
                BizUtils.buildBizMessageLog(outBizMessage));
        return;
    }
}
附录-1:命名规则
| 用途 | 规范 | 解释 |
|---|---|---|
| 领域层服务(sink) | xxx-sink | |
| 应用层服务(service) | /sink/xxx | 通过sink-service透传到领域层的sink服务 |
| /app/yyy | 封装的某一app层聚合服务(延迟服务建议和原服务放在一个聚合服务中) | |
| 适配层服务(source) | xxx-source | 涉及到消息格式转换配置时,才需要配置Source ID |
附录-2:源码目录结构
├── api-gateway  开放平台网关子模块
├── common       公共包子模块
├── docker          Docker-Compose部署相关文件
├── helm               Helm部署相关文件
├── app-spring-boot-starter      app层Spring Boot Starter子模块
├── source-spring-boot-starter      Source层Spring Boot Starter子模块
├── sink-spring-boot-starter        Sink层Sprint Boot Starter子模块
├── log-spring-boot-starter    Log日志Sprint Boot Starter子模块
├── redis-spring-boot-starter  Redis Sprint Boot Starter子模块
├── sample          Sample子模块
│   ├── config      Sample配置文件主目录
│   ├── sample-app          app层Sample子模块
│   ├── sample-sink         Sink层Sample子模块
│   └── sample-source       Source层Sample子模块
├── source      Source服务接入子模块
│   ├── netty-source        Netty接入Source子模块
│   └── rest-source         Restful接入Source
└── sql
    └── Biz-SIP.sql     Biz-SIP数据库初始化脚本